
Looking to speed up your WordPress site and make it load faster?
While WordPress typically doesn't have a good reputation when it comes to site speed, it's entirely possible to create a fast-loading WordPress site by optimizing a handful of key areas for performance and applying a few best practices.
By following this step-by-step WordPress speed optimization guide, you can make your site faster, enhance user experience, and improve your Core Web Vitals and SEO rankings.
1. Start With a WordPress Health Check
When optimizing WordPress for performance, you never start from completely scratch.
Even when working on a new WordPress site on localhost, you have set up your local server environment and installed the WordPress core with the default theme. However, in most cases, you already have an existing WordPress site you want to make faster.
The best way to get started with WordPress speed optimization is by understanding your existing performance problems, as these are the areas you'll need to focus on most.
You can run an initial WordPress health check from the Site Health Status tab, which is accessible from the Tools > Site Health menu in your WordPress admin area.
In the Recommended improvements section, look for issues tagged with Performance. You can expand each recommendation to see a detailed explanation of the issue:

Below the recommended improvements, you can also see the health audits your WordPress site has passed.
This initial health check will help you build a strategy for how to speed up your WordPress site.
If you're working on an existing WordPress site, create a backup before you start to optimize it for performance. You can use either a backup plugin, such as UpdraftPlus or Duplicator, or your WordPress host's backup functionality.
2. Choose a Fast WordPress Hosting Provider
Reliable and fast hosting is the basis of WordPress speed optimization — and it's the one area where investing more money is truly worthwhile.
If you're looking to speed up an existing WordPress site, assess whether your current host meets your needs, or if it's time to upgrade your plan or find a better hosting provider.
To do so, run a free WordPress website speed test and look for signs of poor server performance. You can use the Custom filter in the Metrics Overview section to select the relevant performance metrics — HTTP Request TTFB (indicating slow initial server response time), Full TTFB, and First Contentful Paint:

You have a couple of options to improve poor server performance:
- You might need more server resources, such as CPU, RAM, or storage.
- You can look for a hosting plan that includes performance improvement features, such as support for the HTTP/2 and HTTP/3 network protocols, GZIP/Brotli/etc. text compression, or integration with a content delivery network (CDN).
If you want to speed up your WordPress site even more, you can also sign up for a plan with a managed WordPress host such as Rocket.net, Cloudways, or Kinsta. These managed hosting plans all run on Cloudflare Enterprise, so they give you access to enterprise-level WordPress performance and security.
While they cost more than self-managed hosting plans, they come with dedicated resources, professional support, and extra web performance features that can help you speed up your WordPress site, such as CDN integration, full page caching, and others.
To ensure your WordPress speed optimization efforts remain consistent, steer clear of shared hosting plans. When you host your site on a shared server, it uses the same hardware and competes for resources with other websites, meaning the server may prioritize sites with higher traffic at your expense.
If you're currently on a shared hosting plan, consider upgrading to an option that provides you with dedicated server resources:
- Cloud hosting (note that managed WordPress hosts also serve your site from virtual machines running on cloud platforms such as Google Cloud Platform or AWS).
- VPS (Virtual Private Server) hosting that offers dedicated virtual resources (a virtual machine on a physical server).
- A dedicated server that provides you with a standalone physical server (recommended for larger WordPress sites).
3. Install a Fast WordPress Theme
To speed up your WordPress site, you need a fast theme that works together with the core WordPress software, which means it:
- uses as many native features as possible
- enqueues essential styles and scripts in an optimal way
- blends into the overall WordPress interface (e.g., it shouldn't load unnecessary admin widgets or add too many menu items — for a fast-loading WordPress site, your admin area should be fast too!)
To assess a WordPress theme for performance, you can look for signs such as:
- Modular design – Extra features should be added as modules or extensions that you can turn on and off so that your site only loads the code you really use.
- Follows WordPress coding best practices – The WordPress Developer Handbook maintains a list of best practices that any high-quality theme should implement.
- Uses performance optimization techniques – For example, if a theme implements code splitting or allows you to remove unnecessary scripts that most WordPress sites don't need, such as the built-in Emoji script.
Some examples of free performance-optimized WordPress themes are Astra, GeneratePress, OceanWP, Blocksy, Sydney, Zakra, and Kadence Theme.
After signing up for a WordPress hosting plan, it's also a good idea to compare a few themes for performance by following these steps:
- Create a test site on a subdomain or in your staging area.
- Import a demo of each theme you want to test (to provide the content weight of a typical WordPress site).
- Run our free WordPress website speed testing tool on each theme by activating them one at a time on your test site.
While it's usually possible to test the demos on the theme author's website, testing them on your own hosting can lead to more realistic results.
This is partly because your server environment is the foundation from which your WordPress site will be served to your real users, and partly because some theme authors load the demos using iframes or install various marketing plugins on the demo sites to measure engagement, which can skew the results.
When a WordPress speed test completes, scroll down to the Metric Overview section on the Overview page and select the Page Weight filter, which shows the metrics that tell the most about the real performance of a WordPress theme:
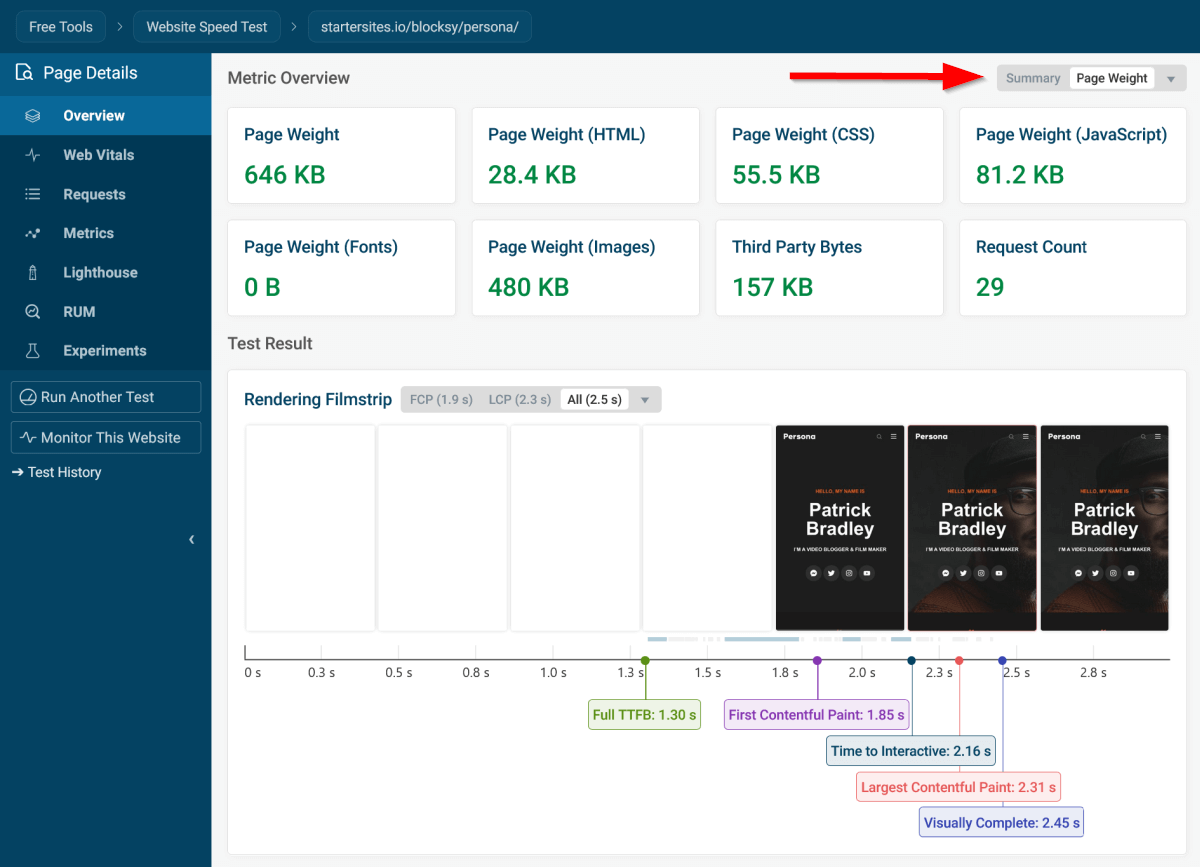
DebugBear makes it super easy to interpret the test results, as it highlights:
- Good results in green.
- Mediocre results in yellow.
- Poor results in red.
However, don't stress if some of the metrics don't score green, as all-green performance results are hard to achieve.
What's more important is comparing how different themes perform on your specific hosting environment so that you can find the best option for your WordPress site.
4. Add Must-Have WordPress Plugins
Plugin bloat is one of the biggest reasons behind slow-loading WordPress sites.
The question of 'how many plugins are too many for a WordPress site' is still an unsolved puzzle of WordPress performance optimization. While performance-wise, the ideal number would be zero, most WordPress websites require at least some plugins to function properly.
Here are some guidelines that can help you find the right balance between performance and functionality:
- Only install the must-have plugins you truly need.
- Watch out for overlapping functionality between different plugins (e.g., some caching plugins also offer CDN integration).
- Test the performance impact of each plugin using our free WordPress speed testing tool on your test site, following the steps detailed in the previous section about how to find a fast WordPress theme.
- Look for plugins with a modular architecture rather than monolithic solutions that also load functionality your WordPress site doesn't need.
- Check if each plugin author is committed to clean, efficient coding practices. In most cases, you can find references to the coding methods they use on their website. Our free speed tests also give you hints if a plugin adds extra performance issues to your site (look for the Recommendation section on the Overview page and expand the recommendations your test site hasn't passed):

For better results, you can also install a performance optimization plugin, such as Perfmatters or WP-Optimize, which can help you implement web performance best practices that speed up your WordPress site.
5. Remove Content Bloat
While unnecessary content can slow down any website, there are some platform-specific steps you need to perform if you want to speed up a WordPress site.
First and foremost — since page builders add extra weight to your site, consider converting your pages created with these tools to native WordPress content using the Gutenberg block editor.
Trimming or breaking up excessively long pages and removing unused sidebars and unnecessary widgets can also help speed up your WordPress site by reducing the DOM size and network payload.
Also review your navigation, including headers, footers, and menus. Some WordPress themes encourage users to make these navigational elements overly complex, even when it doesn't enhance the user experience. Heavy menus add to the DOM size and, being interactive elements, may increase Interaction to Next Paint (INP), too.
Don't forget to pay attention to unnecessary render-blocking requests, either, as they often delay page load time. To learn more, check out our article on how to eliminate render-blocking resources on WordPress sites.
6. Optimize Your WordPress Database
After manually removing unnecessary content, you still need to remove excess data that has accumulated in your database if you want to truly speed up your WordPress site.
Excess data may include:
- Old post revisions and auto drafts
- Spam, deleted, and unapproved comments
- Unused categories and tags
- Pingbacks and trackbacks
- Orphan and duplicated metadata
- Expired transients
Don't forget to back up your database before starting to optimize it.
The easiest and safest way to optimize your database is by using a plugin. If you already have a performance optimization plugin installed on your site, check if it has database cleanup functionality — the best ones, such as the aforementioned Perfmatters and WP-Optimize, include it.
If you want more control over what gets removed and what doesn't, you can also use a dedicated database cleanup plugin such as Advanced Database Cleaner, WP-DBManager, or WP-Sweep.
In case you're averse to adding one more plugin to your site, WordPress also has a default database cleanup tool you can activate by editing your wp-config.php file. However, note that it only performs basic database optimization, and plugins offer more thorough cleanup.
To activate the default database maintenance tool, back up your wp-config.php file, then set the WP_ALLOW_REPAIR constant to true by adding the following line:
define("WP_ALLOW_REPAIR", true);
above this comment:
/* That's all, stop editing! Happy blogging. */
Once WP_ALLOW_REPAIR is enabled, you can access the default database cleanup tool at the /wp-admin/maint/repair.php URL:

You can choose from two options:
- Repair Database – This option checks your database tables for corruption, and if it finds any issues, it repairs them.
- Repair and Optimize Database – This is the option you'll need to use if you want to optimize your WordPress database.
Once the database optimization process completes, remove the above line from your wp-config.php file.
7. Test Your WordPress Site Speed After Optimization
Once you've finished optimizing your WordPress site for speed, test it again by running a free WordPress website speed test on your key pages to see the performance improvements.
Aim for having as many green scores as you can in the Metrics and Recommendations sections on the Overview page.
In addition to the default Lab Overview view, also check other performance metrics by using the feature filter in the top-right corner of the Metrics section:
Set Up Continuous WordPress Performance Monitoring
Continuous WordPress performance monitoring allows you to prevent web performance issues proactively and get automatic feedback from your visitors.
With DebugBear, you can monitor your WordPress site from 20+ test locations around the world and collect various types of web performance data.
For example — on the Overview page, you can see historical trendlines of lab metrics from scheduled tests run from one of our test locations:

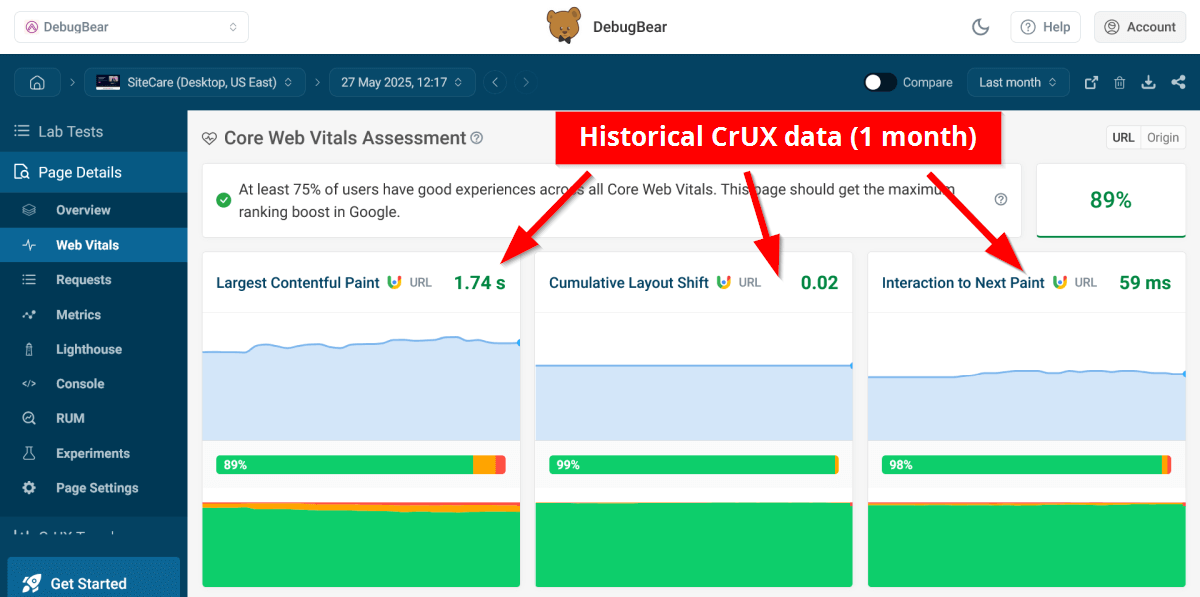
The Web Vitals tab shows you historical Core Web Vitals data from the Chrome User Experience (CrUX) Report, which Google also uses in its search engine algorithm:
To speed up your WordPress site, sign up for a free 14-day trial, which gives you access to DebugBear's full performance monitoring functionality.


Monitor Page Speed & Core Web Vitals
DebugBear monitoring includes:
- In-depth Page Speed Reports
- Automated Recommendations
- Real User Analytics Data